The Hidden Frustration Behind Bizarre AI Anatomy
You just typed the perfect prompt into your favorite image generator. The lighting is stunning, the composition is flawless, and the colors are breathtaking. But then, you zoom in on the subject's hands.
A few months ago, I spent over two hours trying to create a fantasy portrait for a client project. The lighting and colors were breathtaking, but when I zoomed in, the character had seven twisted fingers that looked like spider legs. I felt embarrassed and frustrated, almost ready to give up on AI image tools entirely. That painful lesson taught me that relying on pure luck just doesn't work, and I had to build a real system to fix it.
Suddenly, your masterpiece is ruined. You are staring at a twisted mess of seven fingers, missing knuckles, or hands that look like alien claws. This is a shared nightmare for anyone using generative tools today.
Generative models process billions of data points, as explained by leading AI researchers at MIT Technology Review, but human hands remain incredibly complex. They have joints, shadows, and overlapping parts that confuse the algorithms.
This simple flaw creates a massive roadblock for creators. Let's look at why you might be struggling to find a real solution and how bad information makes it worse:
- You rely on magic words: Many people think adding "perfect hands" to a prompt will solve everything. The machine does not understand this request clearly.
- You waste hours re-rolling: Clicking "generate" over and over again drains your credits and your patience. It rarely fixes the core issue.
- You follow outdated advice: Older methods from early software versions no longer work. Following them just leads to more distorted images.
- You avoid full-body shots entirely: You start cropping out hands completely, which limits your creativity and ruins your visual storytelling.
The emotional toll of this problem is surprisingly heavy. When you cannot get the result you want, it starts to wear you down.
Here is how this issue silently destroys your confidence and peace of mind:
- Imposter Syndrome: You feel like a fake artist because you cannot control the final output of your work.
- Lost Professionalism: Delivering an image with deformed fingers makes you look careless to clients or followers. Just as bad video editing is secretly killing your YouTube money and how to fix it, ignoring bad AI anatomy destroys your digital authority.
- Creative Burnout: Spending three hours fixing one tiny detail makes you want to quit using the software entirely.
- Fear of Judgment: You hesitate to post your art online because you know the first comment will point out the weird fingers.
We need to stop hoping for luck and start using proven systems. Let's fix this problem for good.
The Blueprint to Generating Flawless Digital Fingers
Creating realistic human anatomy with algorithms is not about luck. It is about taking control of the software. You need a step-by-step action plan to guide the machine exactly where you want it to go.
Think of it like learning to fly a drone. If you don't master your photography drone calibration, you will crash. Similarly, if you don't calibrate your prompts and tools, your images will fail.
Here are the most practical, tested methods you can apply today to solve this issue.
Step 1: Mastering the Art of Negative Prompting
The first line of defense against bad anatomy is telling the machine exactly what not to do. A negative prompt acts as a boundary for the software. If you don't set boundaries, the machine will guess and when a machine guesses about human hands, it usually guesses wrong.
How to structure your negative commands:
Do not just type "bad hands". You need to be highly specific about the exact deformities you want to avoid. The system understands specific descriptive words much better than vague concepts.
Words you should always include in your negative prompt:
- Extra fingers
- Missing fingers
- Mutated hands
- Disjointed fingers
- Six fingers
- Melted anatomy
Imagine you are ordering a sandwich. If you just say, "Don't make it gross," the chef has no idea what you mean. But if you say, "No mayonnaise, no onions," you get exactly what you want. Your negative prompt needs that same level of clear instruction.
The Power of Weighting:
Many advanced platforms allow you to add weight to your words. This means telling the system to pay extra attention to a specific command. For example, typing (extra fingers:1.5) tells the engine to work 50% harder to avoid giving your subject a sixth digit.
This simple tweak alone will improve your success rate by a massive margin. Start building a standard negative prompt template and save it in a text document. Paste it into every single generation you do.
Step 2: The Magic of Regional Inpainting
Here is a quick lesson I learned the hard way: typing "perfect hands" into your prompt actually makes things worse because the machine gets confused. My entire workflow changed when I stopped hitting the regenerate button fifty times and started using specific negative prompts with targeted inpainting. Trust me, spending two minutes setting up clear rules saves you hours of useless clicking.
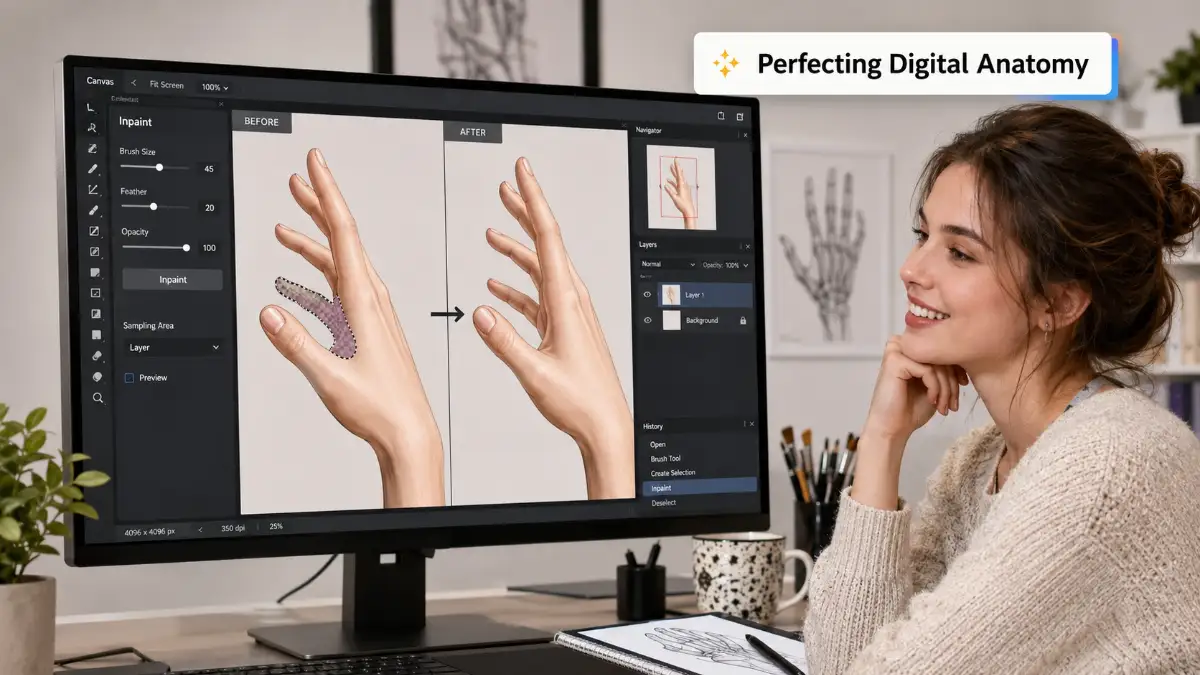
Sometimes, the main image is absolute perfection, but only the left hand is messed up. Throwing away the entire picture is a huge mistake. Instead, you need to use a technique called Inpainting.
Inpainting allows you to highlight a specific area of the picture and tell the software to redraw only that part. It is like using a digital eraser that replaces the mistake with something better.
How to use Inpainting effectively:
First, find the Inpaint or "Vary (Region)" button in your software. Use the lasso tool to carefully draw a circle around the deformed hand. Make sure to leave a little bit of space around the edges so the software can blend the new hand into the old arm naturally.
Changing the prompt for the target area:
When you are inpainting, do not use your original prompt. The machine will get confused. If your original prompt was "A woman standing in a cyberpunk city," delete all of that.
Change the prompt to describe only what belongs in the highlighted box.
Your new prompt should simply be: "A perfect human hand, five fingers, resting naturally." This laser-focused instruction forces the engine to concentrate all its processing power on generating fingers, not a cyberpunk city.
Patience is your best friend here:
Inpainting rarely works on the very first try. You might have to redraw the hand four or five times. Just keep clicking generate.
Eventually, the machine will align the pixels correctly. It is much faster to inpaint one small area five times than to re-generate the entire scene from scratch.
Step 3: Guiding the Machine with Reference Poses
Want to see how this workflow operates in real-time? Watch this quick visual tutorial to see these exact hand-fixing techniques in action before reading the advanced steps below!
If words are not working, you need to show the machine exactly what you mean. Using a reference image is the most powerful way to force correct anatomy.
This process is often called ControlNet, image-to-image, or character reference, depending on the platform you use.
Why references change the game:
Text alone leaves too much room for interpretation. When you give the system a clear photo of a hand, it maps out the exact position of the knuckles, joints, and fingertips. It uses this map as an unbreakable skeleton for your new creation.
How to create your own references easily:
You do not need to search the internet for the perfect hand model. You have two perfectly good hands attached to your own body. If you want your character holding a coffee cup, pick up a real coffee cup. Hold your phone with your other hand, and snap a quick photo of your grip.
Upload this photo into your generator as an image prompt or a depth map. The software will look at your real-life photo and trace the exact finger placement.
Blending the reference with your style:
You might worry that using a real photo will ruin the artistic style of your generation. It won't. You can adjust the "image weight" slider. Setting the weight to around 30% to 50% tells the system: "Use the skeleton of this photo, but paint over it in the style of my text prompt."
This guarantees the fingers are in the right place, but they still look like an oil painting, an anime character, or a cinematic photograph, depending on your original goal. This method requires a little extra effort upfront. But the experts at digital art communities agree that providing a solid visual foundation is the fastest way to professional results.
By combining strong negative prompts, targeted inpainting, and clear visual references, you take the guesswork out of the process. You are no longer hoping the machine gets it right. You are actively commanding it to succeed.
Just like you must organize your financial documents like a pro to ensure a smooth tax season, you must organize your workflow to ensure smooth generations. Setting up these three steps guarantees a massive drop in deformed results.
Next-Level Strategies for Flawless Anatomy
We have covered the foundational steps to stop the software from making silly mistakes. Now, it is time to move into advanced territory. These are the exact strategies professional digital artists use to ensure their work is completely free of anatomical errors.
If you want your images to look completely human-made, you must start thinking outside the generator box. The software can only do so much on its own.
Here are the advanced tactics that will take your work from amateur to expert level.
Step 4: The Strategic Art of Concealment
Sometimes, the smartest way to fix a deformed hand is to never generate it in the first place. Professional photographers and painters have used this trick for centuries. Hands are hard to draw, so they hide them naturally within the composition.
This does not mean awkwardly cropping the image at the elbows. It means planning your prompt so the hands are naturally obscured by the environment or the subject's posture.
Natural ways to hide hands in prompts:
You can easily direct the character's pose to hide complex finger joints. Try adding these phrases to your main prompt:
- "Hands tucked inside coat pockets"
- "Holding a large box with both arms"
- "Hands resting behind the back"
- "Wearing large winter mittens"
Using props to your advantage:
When a subject holds a small object, like a pen, the machine struggles. The fingers have to wrap around a tiny surface area.
Instead, have them hold something large. If the character is holding a giant shield, a thick book, or a large shopping bag, the fingers are mostly hidden behind the object. The software only has to generate the knuckles, which is much easier.
This approach saves you hours of frustration. It allows you to focus on the face, the lighting, and the story of the image, rather than fighting a digital machine over a pinky finger.
Step 5: Post-Production Healing with External Software
Relying 100% on a text-to-image generator is a beginner's habit. True professionals take their almost-perfect generated images into a secondary editing program. Photoshop, Canva, or even free tools like Photopea are your best friends for the final polish.
The power of Generative Fill:
Modern photo editing software now includes its own built-in AI tools. If your main generator gives you a great image but a messy hand, export it. Open it in Photoshop.
Use the lasso tool to select the bad hand. Then, use the Generative Fill feature. Type a simple prompt like "normal hand resting." Because the photo editor is designed specifically for retouching, it often handles these small localized fixes much better than the original generator.
The manual cloning technique:
Sometimes, you just have one extra finger ruining a great shot. You do not need AI to fix this. You just need the Clone Stamp tool.
Select a piece of the background right next to the extra finger. Carefully stamp that background over the unwanted digit. Then, use a soft healing brush to smooth out the edges.
It takes about three minutes to manually paint out an extra finger. It might take thirty minutes to try and force the original software to fix it via text prompts. Learning basic photo editing skills will save you endless headaches.
The Traps Keeping Your Artwork Looking Amateur
Even with the best strategies, it is easy to fall into bad habits. Many creators get frustrated and start making poor decisions that make their images look even worse.
If you want to maintain a professional standard, you must actively avoid these five common mistakes.
1. Accepting the "Good Enough" Generation
This is the biggest mistake you can make. You get an image with beautiful lighting, but the hand has a slightly melted thumb. You tell yourself, "Nobody will notice."
They will notice. Viewers are highly trained to spot strange human anatomy. Releasing an image with a clear deformity instantly ruins your credibility. Never settle for a melted hand. Fix it or delete it.
2. Overloading the Main Prompt
When people get bad hands, they often panic. They start stuffing their main prompt with desperate phrases like "perfect fingers, five fingers, beautifully detailed hand, symmetrical hands."
This confuses the machine. You are pulling its attention away from the main subject. Keep your main prompt focused on the overall scene. Use the negative prompt box to handle the anatomical rules.
3. Ignoring the Scale of the Subject
Generators struggle deeply with small details. If you ask for a wide-angle shot of a crowd in a stadium, the faces and hands will be tiny. The machine does not have enough pixels to render tiny fingers correctly.
If you need perfect hands, move the camera closer. Ask for a "medium shot" or a "waist-up portrait." Give the software enough pixel space on the canvas to actually draw the joints properly.
4. Refusing to Use External Tools
Stubbornness is the enemy of good art. Many creators refuse to open Photoshop because they want a "pure" AI generation.
This is a waste of time. AI is just a tool, like a paintbrush. You are allowed to use an eraser. Combining generation with manual editing is how the top creators achieve flawless results.
5. Generating Complex Actions Too Soon
Asking the software to draw "a hand tying a complicated knot with a rope" is asking for a disaster. Complex, interlocking finger movements are the hardest things for the system to understand.
Start simple. Have your subjects rest their hands on a table. Once you master generating relaxed hands, then you can slowly start testing more complicated grips.
Your Next Steps to Professional Artwork
You now have a complete, step-by-step roadmap to fixing one of the most annoying problems in digital creation. You no longer have to cross your fingers and hope the software plays nice.
You understand how to communicate with the machine using negative constraints. You know how to use regional inpainting to fix small mistakes without destroying your masterpiece. You realize the power of using real-life reference photos to guide the digital brush.
More importantly, you know that avoiding the problem through smart posing is a valid, professional strategy. And when all else fails, you have the skills to jump into external editing tools to clean up the mess.
The days of being embarrassed by six-fingered mutants are over.
I used to waste entire afternoons stressing over mangled fingers, but taking control of these simple steps gave me my creative freedom back. Pick just one prompt today, test out these methods, and watch how fast your confidence returns. You have everything you need now, so go create something you are proud to share!
Your next step is to put these theories into practice. Open your favorite generator right now. Type in a prompt that includes a visible hand. Deliberately try to make a mistake, and then use the inpainting method to fix it.
Practice makes perfect. The more you use these specific control techniques, the faster and easier your workflow will become. You have all the knowledge you need. Now, go create something flawless.
Disclaimer: This guide, "How to Fix Weird AI Hands: The Complete Blueprint for Perfect Images," is intended strictly for educational and informational purposes. The workflows, software techniques, and prompting strategies shared here reflect personal practical testing and the current state of generative AI tools. Software features, algorithms, and interface layouts may update over time, and individual results may vary depending on the platform you use.