The Frustrating Silence of a Broken Laptop Speaker
Last Tuesday, I sat down to catch up on a show I had been dying to watch all week, only to be met with dead silence. I clicked the volume buttons like crazy, restarted my laptop twice, and still could not get a single sound out of my speakers. I honestly thought my motherboard was fried and that I was looking at a heavy repair bill. That night of sheer frustration is the exact reason I put this simple troubleshooting guide together.
Imagine sitting down to watch your favorite movie after a long, exhausting day at work. You hit play, lean back in your comfortable chair, and quickly realize there is absolute silence in the room. You press the volume key up and down, but your laptop speakers produce no sound at all.
This sudden hardware failure can easily ruin your mood and waste your precious free time. Whether you are trying to join an important online meeting or just want to listen to some relaxing music, a silent computer creates massive frustration. We rely on audio for almost everything we do online, and losing it feels terrible.
When your device suddenly stops talking to you, it feels like a major technical disaster. Most people panic and immediately search online for quick fixes, only to face even bigger problems.
- Terrible advice: Random tech forums often suggest downloading sketchy software instead of finding the root cause.
- Malware risks: Downloading third-party driver updaters can easily introduce dangerous viruses into your system.
- Breaking the system: Changing advanced registry settings without proper knowledge can crash your operating system entirely.
- Outdated guides: Following old tutorials leaves users stuck, because modern operating systems handle audio very differently now.
- Warranty void: Taking the laptop apart based on a random video often causes permanent hardware damage and voids your warranty.
Dealing with this constant tech trouble takes a heavy toll on your daily confidence and peace of mind.
- Fear of missing out: You constantly worry about missing important alarm sounds, notifications, or messages from family members.
- Professional embarrassment: Trying to explain to your boss that your audio just died moments before a presentation is incredibly stressful.
- Loss of control: It makes you feel completely helpless when a machine you use every single day suddenly refuses to cooperate.
- Financial anxiety: The terrifying thought of spending hundreds of dollars at a repair shop for a simple sound issue keeps you awake at night.
A Practical Guide to Getting Your Sound Back
You do not need to be a computer genius to fix these common audio problems. By following a logical, step-by-step approach, we can easily figure out exactly what went wrong. Let us explore the safest and most effective methods to bring your sound back to life.
Step 1: Investigating the Basic Volume and Physical Controls
Before we tear apart your system settings, we need to look at the absolute simplest solutions first. It sounds too easy, but you would be surprised how often basic volume controls are the actual problem. Think about a time your television stopped working, and you eventually realized it was simply unplugged.
The exact same logic applies to your laptop speakers. Sometimes, your finger might accidentally brush against the keyboard mute button while you are typing a fast email. This tiny mistake instantly kills all audio output without warning.
Check the taskbar icon:
Look closely at the bottom right corner of your computer screen. If you see a small 'x' next to the speaker icon, your entire system is completely muted. Just click the icon and drag the slider up to at least fifty percent. Do you hear that familiar 'ding' sound? If so, you just solved your problem in two seconds.
Inspect the physical buttons:
Many premium and business laptops have dedicated physical volume dials or switches on the side of the machine. Make sure these are turned all the way up. You should also test your keyboard function keys immediately. Try pressing the 'Fn' key simultaneously with the volume up button, which is usually F3 or F12 depending on your brand.
Examine the volume mixer:
Did you know your computer can mute specific programs while leaving other apps loud and clear? This is a very common issue that confuses many people. Right-click the speaker icon on your screen and select 'Open Volume Mixer'.
You will see individual volume sliders for your web browser, media player, and system sounds. If the slider for Google Chrome is pulled all the way to the bottom, YouTube videos will play in complete silence. This happens even if your main system speaker volume is set to maximum.
Step 2: Taking Back Control from Invisible Bluetooth Devices
If the basic volume settings look perfectly fine, the next biggest suspect is an external connection. Your laptop is smartly programmed to route sound away from the speakers the moment it detects another device. When you plug in headphones in a quiet library, you naturally want the main speakers to shut off instantly.
However, the tiny sensors that control this helpful feature can easily get confused. Let us look at the physical headphone jack first.
The headphone jack sensor issue:
Inside that tiny round port on the side of your computer, there is a delicate micro-switch. It constantly tells the motherboard when a physical plug is inserted. Sometimes, regular dust, pocket lint, or debris gets stuck inside that small port over time.
The computer feels the dirt pushing against the switch and assumes a pair of headphones is plugged in. Because of this false signal, it turns off your main laptop speakers to protect your privacy. You can easily fix this by taking a clean, dry cotton swab and gently wiping the inside of the headphone port.
The Bluetooth hijacking scenario:
We live in a world heavily filled with wireless technology. Your wireless earbuds, smart speakers, or even your living room smart TV might be actively stealing your audio. If you left your wireless headphones sitting on the desk, your computer might still be connected to them.
All of your sound is playing directly out of those tiny earbuds instead of your main laptop speakers. To test this logical theory, go into your settings and turn off Bluetooth completely. This action forces the computer to sever all wireless connections immediately.
Here is a quick pro tip from someone who spent two hours pulling their hair out: always check your Bluetooth before doing anything drastic. I once almost wiped my entire audio system, only to realize my laptop had secretly connected to my wireless earbuds sitting in my jacket across the room! Trust me, the simplest glitch is usually the one we completely overlook.
Once Bluetooth is completely disabled, play a test video or an audio file. If your sound magically returns, you now know a rogue wireless device was hijacking your audio signal. This happens to me all the time when my phone connects to my car audio from inside the house.
Step 3: Forcing the Operating System to Recognize Your Speakers
Now we need to dig into how your operating system handles deep sound routing. Sometimes, your computer simply forgets which physical speakers it is supposed to use. Your laptop usually has multiple ways to output audio at any given time.
It has the built-in internal speakers, maybe an HDMI port connected to an external monitor, and virtual audio cables for recording software. The operating system relies on a default setting to know exactly where to send the sound.
Understanding default playback devices:
If this primary setting gets changed by a random software update, you get total silence. Think of it exactly like a train track switch. If the switch on the track points the wrong way, the train never reaches the correct station.
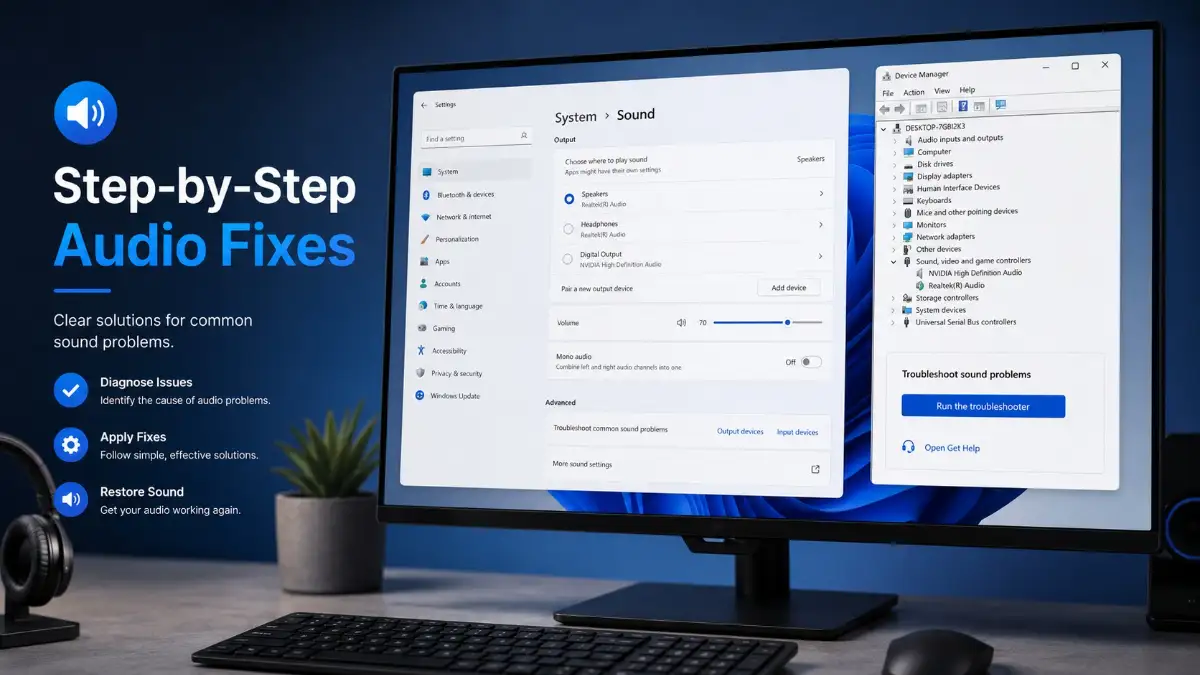
We need to point the digital track back to your main speakers. Right-click the speaker icon on your taskbar and boldly click on 'Sound settings'. Scroll down until you find the section labeled 'Advanced sound options' or 'More sound settings'.
A small, older-looking window will pop up right on your screen. Look carefully at the 'Playback' tab at the top. You will see a detailed list of every single audio device connected to your machine.
Fixing the wrong default choice:
You might see technical options like 'Realtek High Definition Audio' or simply the word 'Speakers'. If a random monitor or a virtual audio cable has a green checkmark next to it, your computer is sending the sound to the wrong place.
Right-click on your actual laptop speakers and confidently select 'Set as Default Device'. Then, right-click it again and choose 'Set as Default Communication Device'. This forces all regular sound and voice calls to go through your main laptop speakers.
Running a quick diagnostic test:
While you are still on that same menu, we can force the computer to test the physical hardware directly. Right-click your newly selected default speakers and hit 'Test'. You should hear sound bouncing playfully from the left speaker to the right speaker.
If you hear the testing chimes, your physical hardware is perfectly fine and healthy. The issue was just a simple software routing mistake that you have now corrected.
Restarting the Core Audio Services
If setting the default device did not work, the actual background program running the sound might have silently crashed. Windows uses a specific, hidden program called 'Windows Audio' to manage every single sound you hear. If this background service freezes, your speakers will always stay completely silent.
This is exactly like the engine of a car suddenly stalling at a red light. Even if you have a full tank of gas, the car will not move until you manually restart the engine.
How to restart the audio engine:
Press the Windows key and the letter 'R' at the very same time. This simple shortcut opens a small 'Run' dialogue box in the corner. Type services.msc carefully into the box and press enter.
A long, detailed list of background programs will immediately appear on your screen. Do not let this technical list intimidate you. Scroll down alphabetically until you find a line specifically called Windows Audio.
Right-click on this specific line and look at the small pop-up menu. If you see the word 'Restart', click it right away. The computer will take a few seconds to shut down the frozen sound system and boot it back up fresh.
You should also check the service right below it, called Windows Audio Endpoint Builder. Right-click and restart this important one as well. These quiet background services handle the digital handshake between your software applications and the physical speaker hardware.
When you force them to restart, you instantly clear out any temporary software glitches or memory leaks that were blocking your sound. Many highly paid tech experts use this exact method when diagnosing computers for worried clients.
It is completely safe, highly effective, and requires absolutely no special software. Once the services finish restarting, open up a new browser tab and play a video. In most cases, your audio will be loud, clear, and perfectly synced again. Taking the time to understand these basic settings gives you immense control over your machine and saves you unnecessary frustration.
We already covered the basic settings and invisible wireless connections in our troubleshooting journey. Now we need to look at the deep software layers that actually command your sound hardware. This is where most permanent fixes happen when dealing with stubborn tech problems.
Think of your laptop's audio driver as a professional translator. It takes digital code from your operating system and translates it into physical sound waves. If this translator gets sick or forgets the language, your speakers simply stop working.
According to official Microsoft Windows support documentation, a corrupted driver is the most frequent cause of total audio failure. We can fix this easily by forcing the system to forget the broken driver and install a fresh one. Sometimes, these deep hardware communication errors happen because the system is under extreme stress.
If your fan is constantly spinning loudly, you might want to learn how to diagnose and fix overheating issues in high-performance laptops. Excessive heat can actually cause the audio chip on your motherboard to temporarily shut down to prevent melting. Let us walk through the exact steps to replace your broken audio translator safely.
Mastering the Device Manager for Driver Updates
If you prefer a quick visual walkthrough, check out this short video showing exactly how to reset and update your audio drivers step-by-step. Watch it below to follow along, and then keep reading to avoid dangerous fixes that could cost you money!
Your computer has a master control panel called the Device Manager. This hidden menu lists every single piece of hardware physically attached to your machine. To find it easily, right-click the Windows Start button and select Device Manager from the pop-up list.
A new window will open showing a long list of technical categories. Look closely for the category named Sound, video and game controllers and click the small arrow next to it. You will see your main audio device listed here, usually named Realtek High Definition Audio.
Many trusted tech experts at PCMag suggest that completely uninstalling this device is the fastest way to solve the problem. Right-click on your audio device and confidently select Uninstall device from the menu. A warning box will pop up on your screen, but do not panic at all.
Make sure you check the small box that says "Attempt to remove the driver for this device" if it appears. Click uninstall and simply restart your computer normally. When Windows boots back up, it automatically detects the missing driver and installs a fresh, working copy directly from the internet.
This automatic process is exactly like deleting a buggy phone app and reinstalling it from the app store. It clears out all the corrupted data and gives your speakers a clean slate.
The Power of Rolling Back a Bad Update
Sometimes, the newest software update is actually the exact thing causing your audio problem. Tech companies occasionally release large system updates that contain unexpected bugs. If your sound was working perfectly yesterday but stopped working today, a bad update is likely the culprit.
You can actually tell Windows to go back in time and use the older, working version of the driver. Go back into your Device Manager and right-click your main audio device again. This time, select Properties and click on the Driver tab located at the top of the small window.
Look for a button clearly labeled Roll Back Driver. If the button is clickable, press it immediately to begin the reversal process. Windows will ask why you are rolling back, so just select "Previous version of the driver performed better" and hit okay.
The screen might flash quickly, and your audio should instantly return to normal. As a digital content creator, unexpected audio bugs can completely ruin your daily workflow. In fact, ignoring these technical glitches is exactly how bad video editing is secretly killing your YouTube money and how to fix it.
Having clean, working audio is absolutely essential for any digital work you do today. A quick driver rollback saves you from missing deadlines and losing audience engagement.
Keeping Your Sound System Healthy Long-Term
Now that we have explored the advanced software fixes, we need to talk about long-term prevention. Maintaining a healthy computer system is exactly like maintaining a healthy car engine. You need to follow a few simple habits to keep things running smoothly every day.
First, always let Windows complete its official system updates without interrupting the loading screen. Turning off your laptop forcefully while it says "Updating" can permanently corrupt your core audio drivers. Second, handle your physical headphone jacks with extreme care when listening to music.
Yanking headphones out of the port aggressively damages the internal micro-switches over time. Always pull the plug out gently by holding the hard plastic connector, never pull by the wire itself. Finally, perform a standard restart on your computer at least once a single week.
Simply putting the laptop to sleep every night allows temporary software glitches to build up in the system memory. A full restart flushes the memory and gives your audio services a much-needed break.
Dangerous Troubleshooting Mistakes That Cost You Money
When faced with sudden tech problems, people often panic and make terrible decisions out of frustration. The internet is full of bad advice that can turn a simple software glitch into an expensive hardware disaster. We need to actively identify these dangerous traps so you can safely avoid them.
Repairing your computer requires patience and logic, not aggressive shortcuts. Just like when you take the time to master your photography drone calibration to avoid costly repairs, treating your laptop carefully saves you a massive amount of cash. Here are the five biggest mistakes you absolutely must avoid.
Relying on Shady Third-Party Driver Updaters
If you search for "audio driver fix" on Google, you will see dozens of advertisements for magical software programs. These flashy websites promise to update all your drivers magically with just one single click. Do not ever download these suspicious programs onto your personal machine.
These applications are almost always loaded with malware, annoying pop-up ads, or hidden subscription fees. They frequently install the wrong drivers, which causes even more system crashes down the line. Always get your software updates directly from the Windows update menu or the official website of your laptop manufacturer.
Digging Inside the Port With Sharp Objects
We talked earlier about how simple dust can trick the internal headphone jack sensor. Many people read this fact and instantly grab a metal safety pin to dig the dirt out. This is a massive physical mistake that instantly breaks the internal connections.
Metal objects will permanently scratch the gold contact pins inside the jack and cause a permanent short circuit. If you actually need to clean the port, only use a wooden toothpick or a soft, dry cotton swab. Be incredibly gentle with the hardware, just like you are cleaning the lens of an expensive camera.
Blindly Deleting System Registry Files
Some older tech forums will tell you to open the hidden Windows Registry Editor to fix sound bugs. They give you a random list of code strings to delete or modify manually. The registry is literally the central nervous system of your entire computer.
If you delete the wrong file by accident, your computer will refuse to turn on ever again. You will face the terrifying blue error screen immediately upon startup. Never touch the system registry files unless you are a certified IT professional working on a backup machine.
Running Straight to the Local Repair Shop
When the sound abruptly stops, many users instantly grab their car keys and drive to the local tech store. Repair shops secretly love this because they charge heavy diagnostic fees just for looking at the machine. A dishonest technician might charge you a hundred dollars just to click the basic "unmute" button.
Always spend at least one full hour trying the basic software fixes we discussed today. The vast majority of the time, the problem is a simple setting you can change for completely free. Save your hard-earned cash for actual hardware failures that require physical replacement parts.
Buying Expensive External Sound Cards Prematurely
Another common panic reaction is buying an external USB sound card directly from Amazon. People wrongly assume their internal sound board is completely fried and needs an immediate hardware replacement. While USB sound cards do actually work, they are usually a total waste of money for this specific issue.
You end up permanently using up a valuable USB port and carrying around a bulky adapter everywhere you go. Try the driver uninstallation trick first before spending any money on external hardware accessories. You already paid for the built-in speakers when you bought the laptop, so we should make them work.
Bringing Joy and Sound Back to Your Digital World
Dealing with a silent laptop feels incredibly isolating and frustrating during the first few moments. However, you now possess the exact blueprint to diagnose and fix these problems like a seasoned tech professional. You never need to feel helpless the next time your computer decides to mute your favorite song.
By understanding how the volume mixer, Bluetooth sensors, and default playback devices operate, you hold all the power. You know exactly how to guide the digital audio signal straight into your physical speakers. More importantly, you know exactly how to avoid the expensive repair traps that catch regular computer users off guard.
Tech problems are rarely as terrifying as they initially seem on the surface level. They are simply logical puzzles waiting for you to apply the right sequence of simple steps. When you take the time to learn these troubleshooting skills, your daily confidence with modern technology grows massively.
Your Next Steps to Technical Success
I want you to test these methods right now, starting with the absolute easiest fixes on the list. Open your system volume mixer, check for hidden Bluetooth connections, and carefully verify your default device settings. Do not let the false fear of breaking something stop you from clicking around the settings menu.
You are completely safe as long as you avoid downloading shady software or picking at physical ports with metal tools. Once your sound is finally restored, you can get right back to enjoying your digital hobbies. You can relax, play some background music, and maybe learn how to generate high-quality conceptual art using AI and keep your budget intact.
Technology is fundamentally designed to make our lives richer, easier, and much more entertaining. Save this detailed guide in your internet bookmarks so you can easily find it later. The next time a friend or family member panics over a silent computer, you will be exactly the expert they need.
I know how overwhelming tech glitches can feel, but you do not need to spend money at a repair shop for a simple fix. Take a deep breath, run through these logical steps one by one, and you will have your speakers working again in no time. You have got this, so go ahead and give it a try right now!
Disclaimer: The troubleshooting steps provided in this guide are for general educational and informational purposes only. While these methods are safe and effective for standard operating system issues, individual laptop hardware and software configurations may vary. Exercise caution when modifying system settings or handling your device.